Background: The neural substrate of information encoding and processing requires a precise control of the animal's behavior. Most of what has been learned from the rodent navigational system results from relatively simple tasks in which the movements of the animal is controlled by corridors, passive movements, treadmills or virtual reality environments. While a lot is being learned from these types of experiments, recent evidence has shown that such artificial constraints may have significant consequences on the functioning of the neural circuits of spatial navigation.
New Methods: We present a novel and alternative approach for effectively controlling the precise direction and speed of the animal in an ethologically realistic environment, using a small robot (Sphero). 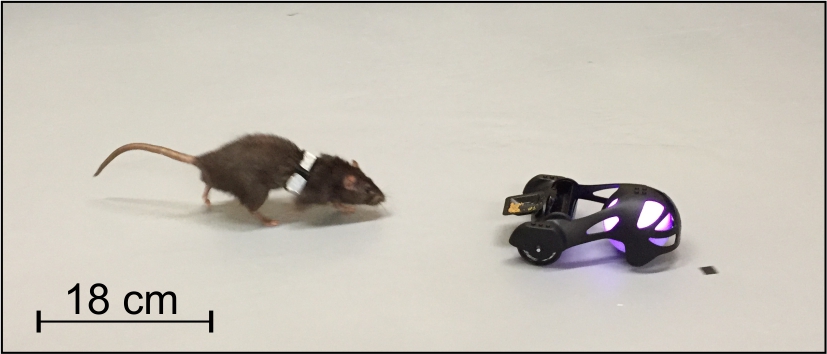
Results: We describe the robotic framework and demonstrate its use in replicating pre-programmed or rat-recorded paths. We show how the robot can control the movement of a rat in order to produce specific trajectories and movement speeds. We demonstrate how the robot can be used to aid the rat in learning a spatial memory task in a large and complex environment. We show that dorsal hippocampal CA1 place cells do not remap when the rat is following the robot,
Comparison with Existing Method(s): Unlike many existing methods, our framework only involves positive motivation and has been tested together with wireless electrophysiology in large and complex environments.
Conclusions: Our robotic framework can be used to design novel tasks and experiments in large and complex environments in which electrophysiological recordings are largely devoid of maze or task-dependent artifacts.
Full Paper
Code and Instructions (last update 1/2021)
Introduction: There are 3 kinds of Spheros. The older ones (Sphero2.0, that you double tap to wake up) are refered to with a 3 letter code (e.g. WPR). Those are the colors that start flashing when Sphero wakes up (e.g. White, Purple, Red). Those use a regular BlueTooth interface. All you need to do in Windows is to pair your sphero with your BlueTooth receiver, as you would for a mouse or speakers (right-click the Bluetooth icon, 'add device'), then go to Step3 below.The newer ones (Sphero SPRK+, sphero mini) are always 'on' and use the BlueTooth LE (Low Energy, BLE) interface. These Spheros are identified by their MAC Address. For those, follow the steps 1-2 below. At this point we do not support Sphero Bolt.
- You will need to install LabView 2019 Runtime engine (32-bits, freely available from National Instrument), and the latest NI-VISA (free as well)
- If you are using a BLE Sphero, you will need a BlueTooth Low Energy (BLE) connection. If your computer does not have one, you can get a cheap USB dongle. We use the BlueGiga dongle
(e.g. Silicon Lab BLED112-V1 from DigiKey).
- You will need a garden-variety Joystick or game controller. We use a Logitech
Extreme 3D. (we also tested with a Side Winder joystick, a PS4 controller (USB attached) and an XBoxOne controller (USB attached))
- A Sphero! We assume you got the latest version (SPRK+ for example). Make sure to connect to it with the Sphero App on your cell phone to update the firmware.
- Our Software. At the time of this writing, we distribute a 'simple version' that should keep you going. We are cleaning up/revising the full version because the Sphero company has changed their BlueTooth protocol and we are catching up! This software has been developped and tested on Windows 10-64 bit machines (DELL and HP). The current version of our software is 4.0b.
Step1: Hardware Installation
- Plug in the BLE dongle. Windows should automatically detect it and install the correct drivers. If succesful, the driver installation window should give you the COM port assigned with the dongle (e.g. COM3). You can also find it from the device manager by expanding the 'Ports (COM & LPT)' section. You should see 'BlueGiga Bluetooth Low Energy (COM3)' there. Make a note of the COM port (here 3)
- Note: If the BLE dongle is not recognized (look at the device manager), install the BLE112-V1 dongle drivers. Just unzip, right-click on the .INF files and choose Install.
Step2: Find the MAC address of your Sphero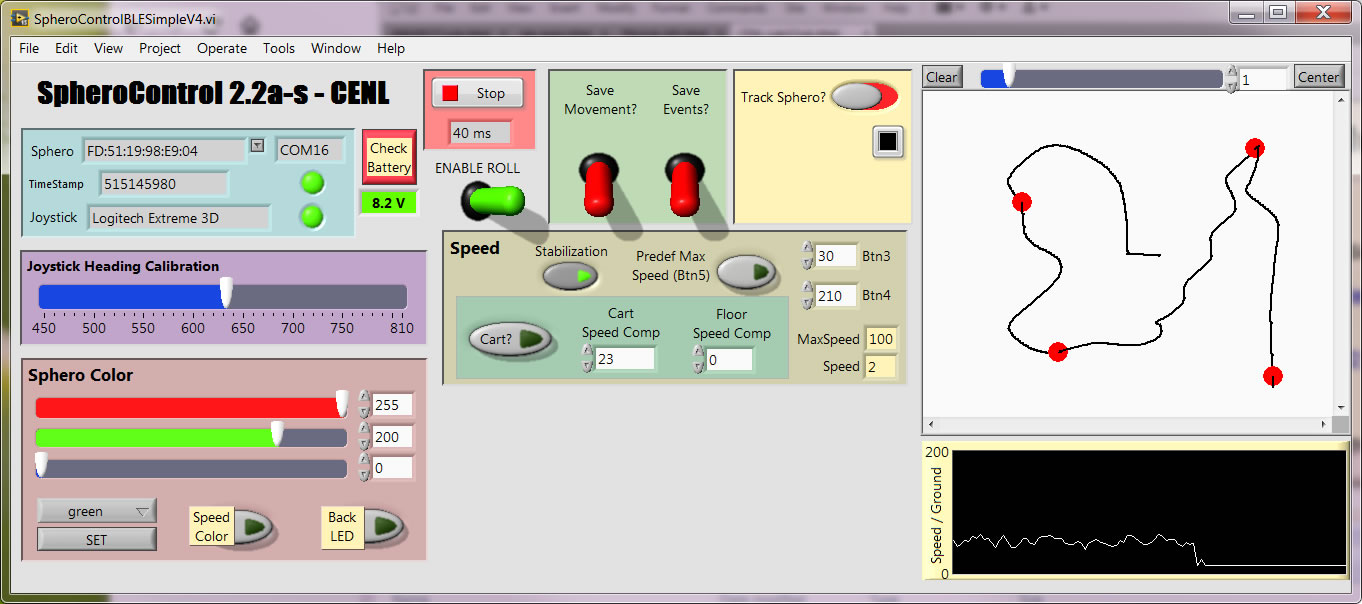
- After unzipping our software, you should see a HWScanner folder. In it, edit the HWScanner.ini file and the BLECOM line to match the COM port above.
- Plug in your Joystick or game controller
- Run the HWScanner.exe application. After a few second the 'scanning' button should blink, and the table should be updated with whatever BLE bluetooth devices are detected. One of them should be your Sphero! The middle part of the panel will list the control devices recognized (e.g. Joystick, Game controller), the bottom part lists the regular bluetooth paired (e.g. Sphero-YRR, for older spheros)
- Make a note the the MAC address of your Sphero (looks like
FD:52:19:98:E9:02). Make a note of the exact name of the control device.
- Close the HWScanner program
Step3: Configure and Play!
- Open the SpheroControlBLESimple folder from our software. Edit the SpheroControl.ini file with the correct COM port, and correct 'Connecting Sphero' MAC address you noted above (for BLE devices). Or just set the name of your regular sphero (e.g. WPR). Edit the name of the control device extacly as shown in step 2 above.
- If you have an original Sphero (2.0) double tap it to wake it up. The BLE ones (SPRK+, mini) do not need to be double-tapped.
- Run the program!
- After a few seconds, the TimeStamp numbers (ms) should change rapidly, and your Sphero should light up. This is your cue that all went well and that you are ready!
- Flip 'Enable Roll', flip the throttle control of the joystick mid-range, and move the joystick... Sphero should move! Adjust the 'Joystick heading calibration' to match the orientation of your joystick/thumbstick with that of Sphero...
- Flip the 'Track Sphero' switch if you want to track the movement of Sphero (odometry information).
- Button 5 makes Btn3 and 4 active, and will allow you to switch to 2 predefined max speeds (precise speed control, see .ini file).
Button 6 will draws a red circle on the path (marker).
- Make sure to click 'Stop' when you are done, to cleanly disconnect from Sphero.
-
Everything else should be (reasonably) intuitive!
- ps: About the blank areas in the GUI: we are working on other functionalities... stay tuned!
- pps: At the time of this writting (V4.0b-s) all 3 Spheros are supported (Sphero 2.0, Shpero SPRK+ and Shero Mini), but the tracking does not work on the mini yet. Sphero Bolt is not supported yet.
Have fun and let us know how things go!
We grafully acknowledge NSF grant: CRCNS-1429937 and ONR MURI N000141612829.
Notes:
- Older version of the software (as in the paper): The original software was writtent in Labview 2015 (Runtime 2015) and can be found here. It was used on Windows 7.
Brought to you by the Computational and Experimental Neuroscience Laboratory